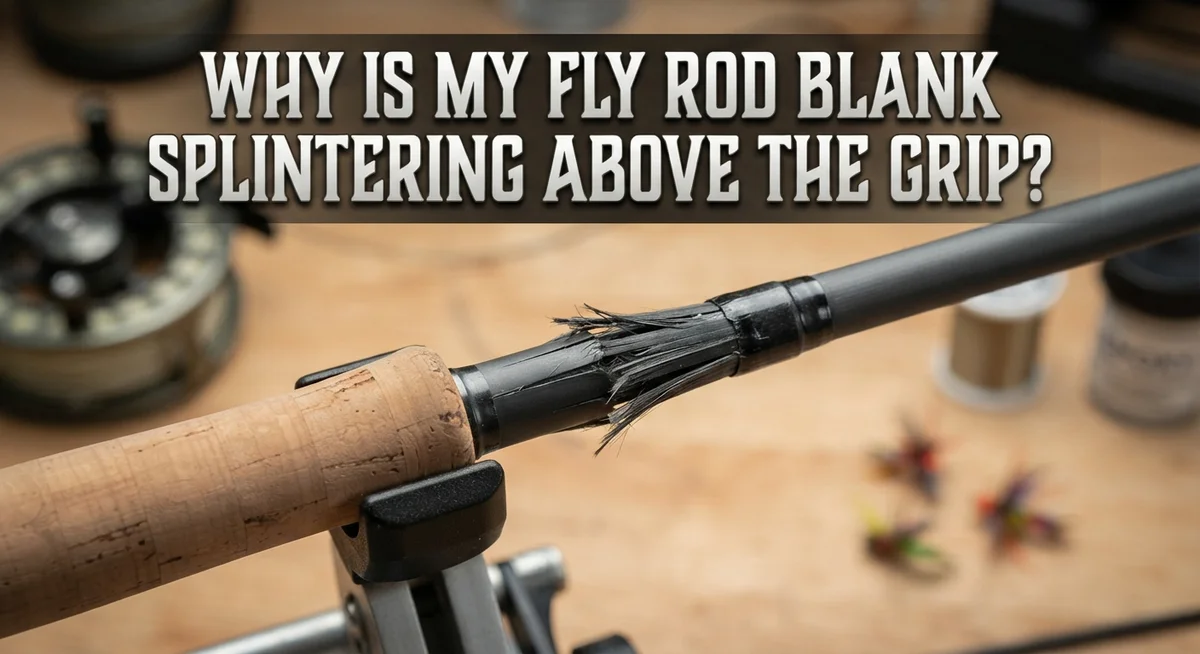
Why Is My Fly Rod Blank Splintering Above The Grip?
Your fly rod feels perfect on the water. Then one day, you spot a splinter above the grip. Panic sets in fast.
This problem happens more often than you think. Many anglers face the same issue, right above where the cork ends.
Why does this happen? The area above the grip lacks support. The cork below adds strength. But that bare blank section above it stays exposed and delicate.
Sudden shocks make things worse. A hard hookset or a fly line snag can stress this weak zone. Grabbing the blank above the grip for extra leverage causes damage too.
Poor grip installation plays a role as well. Forcing a grip onto the blank creates hidden stress. That stress often shows up later as cracks or splinters.
In a Nutshell
- Weak support zone: The area right above the grip has no cork backing. This makes it thinner and more fragile than the rest of the rod.
- Sudden shocks cause cracks: A hard hookset or a fly line catching on something can send stress straight to this weak spot. The blank simply cannot absorb that jolt.
- Bad habits make it worse: Grabbing your rod above the grip for extra leverage puts direct pressure on the most vulnerable part. Avoid this at all costs.
- Installation matters: If your grip was forced on during building, it may have already stressed the blank. A grip should slide on smoothly with just two fingers.
- Some blanks are prone to it: Certain rod models show repeated failures at the same spot, often near the sixth guide. This suggests a design flaw rather than user error.
- Repair is possible: Small splinters can sometimes be stabilized with super glue, light sanding, and a properly reinforced tip top.
Understanding Fly Rod Blank Anatomy Above The Grip
The area above your grip is unique. Unlike the section below the grip, this zone has no cork or other material backing it. The blank sits exposed to direct stress and impact.
Your fly rod blank is a hollow tube made from composite materials. These materials are strong when stress distributes evenly along the rod’s length. However, the grip acts as a transition point. Below the grip, cork provides structural support. Above the grip, that support suddenly stops.
This creates a weak zone. The blank must handle all casting forces without reinforcement in this area. When you cast, load the rod, and fight fish, stress concentrates right at this transition. The blank flexes differently here than it does lower down.
The upper blank section is also thinner and more delicate than you might think. Manufacturers design this part to be lightweight and responsive. That responsiveness comes from using less material. Less material means less strength to resist sudden shocks.
Splintering happens most often at consistent failure points on specific blanks. Some rod models show repeated failures near the sixth guide area. This tells us the problem isn’t random. The blank’s design or material composition at that exact spot makes it vulnerable.
Understanding this anatomy helps you protect your rod. The blank above the grip needs careful handling because it lacks the structural backup of the grip section below. You cannot reinforce this area the way manufacturers reinforce other parts of the rod.
When you know the blank is weak here, you change how you use the rod. You avoid grabbing above the grip. You prevent sudden jerks. You keep fly lines from catching on the blank. These simple adjustments prevent most splintering problems before they start.
Why This Specific Zone Is Prone To Splintering
The area above your grip experiences stress differently than other rod sections. This zone sits between two distinct environments: the supported grip below and the unsupported blank above. The transition creates a natural weak point.
Your fly rod blank is a hollow tube made from composite materials like fiberglass or carbon fiber. Above the grip, this tube becomes thinner and more delicate. The cork grip provides structural reinforcement below, but once you move past it, that support vanishes. This is why splintering concentrates in this exact zone.
The blank lacks any internal bracing or additional layers in this area. Manufacturers design grips to protect the blank directly beneath them. Everything above the grip receives no such protection. The material must handle all casting stress, hook-setting force, and accidental impacts on its own.
Certain rod blanks show repeated failures at the same location, often near the sixth guide area. This suggests some designs have inherent weak spots in this transition zone. The blank may have a subtle manufacturing inconsistency or a slightly thinner wall section. Once one rod fails there, similar models often fail in the same place.
Sudden shocks cause the most damage in this vulnerable area. A hard hookset sends shock waves through the blank. A fly line catching on something creates sudden jerking motion. These sudden forces concentrate stress on the thinnest, least reinforced section of your entire rod.
Your grip installation also matters significantly. If the grip was forced onto the blank during building, it may have already created micro stress. The blank could have been slightly compressed or twisted. This pre-existing stress makes splintering more likely later when you cast or fight a fish.
Understanding this anatomy changes how you handle your rod. You now know exactly why this zone needs careful, gentle treatment. Smooth loading and controlled movements protect your blank from damage.
Common Causes Behind Blank Splintering
Splintering above your fly rod grip happens for specific reasons. Understanding these causes helps you prevent damage and fix problems early.
Lack of structural support is the main culprit. Your grip provides reinforcement below it, but the blank above the grip sits completely exposed. This zone has no cork backing or extra layers to absorb stress. The hollow tube design of your blank makes this area especially fragile.
Sudden shocks cause immediate damage. A hard hookset sends stress waves straight through the blank. Your fly line catching on something creates a sudden jerk. These quick movements hit the weakest part of your rod. The thin, delicate blank section above the grip cannot handle this impact well.
Improper handling accelerates splintering. Grabbing your rod above the grip for leverage puts direct pressure on the vulnerable zone. This common habit weakens the blank over time. Forcing your grip onto the blank during installation can also stress the fibers and create small cracks that grow later.
Some blanks fail repeatedly. Certain rod models show consistent failures at the same spot, often near the sixth guide area. This suggests a design weakness in those specific blanks. If your rod fails in the same place twice, the blank itself may be prone to this problem.
Installation mistakes matter too. If your grip was installed with too much force, the blank may already have micro cracks. These tiny splits expand when the rod experiences normal use and stress.
The combination of weak anatomy, sudden shocks, and rough handling creates the perfect conditions for splintering. Most cases involve at least two of these factors working together. Recognizing these causes lets you adjust your technique and protect your investment.
Grip Installation Mistakes That Trigger Cracks
Forcing your grip onto the blank during installation is one of the most common mistakes that triggers splintering. When you push the cork or foam grip too hard, you apply uneven pressure across the blank’s delicate surface. This pressure can create micro fractures that grow over time.
The blank needs to slide onto your grip smoothly. If you feel resistance, stop and check your technique. You should be able to slide the grip on using just two fingers of pressure. Anything more means something is wrong.
Many builders grab the blank above the cork grip to use it as leverage while installing the grip. This is a critical mistake. When you hold the blank above the grip and pull or push, you’re bending that weak zone in ways it cannot handle. The blank can crack immediately or develop hidden damage that shows up later during casting.
Rushing the installation process also causes problems. Take your time and work slowly. If the grip sticks partway, do not force it further. Remove it completely and reassess. Check that your blank’s diameter matches your grip’s inner diameter. A mismatch will cause binding and force you to apply excessive pressure.
Temperature matters too. Cork and foam expand and contract with heat and humidity. Installing a grip in cold conditions and then exposing the rod to heat can create stress as materials expand at different rates. This stress concentrates right above the grip where the blank is most vulnerable.
Proper installation prevents future splintering. Slide the grip on gently. Never use the blank above the grip as a handle during assembly. Work in consistent temperature conditions when possible. These simple steps protect your blank from damage that could otherwise ruin your rod before you ever cast it.
Step-By-Step: Inspecting And Repairing A Splintered Blank
Start by examining the splintered area closely. Look for small cracks, raised fibers, or visible damage above your grip. Use good lighting so you catch every detail. Run your finger gently along the blank to feel for rough spots or sharp edges. Take your time with this step because you need to see exactly where the damage starts and stops.
Next, assess how deep the splintering goes. Light surface damage differs from cracks that penetrate the blank’s walls. Gently press around the damaged zone with your fingers. If the blank feels soft or flexes oddly, the damage may be more serious than it looks. Deep cracks that go through the wall require different repair approaches than surface splintering.
Clean the area thoroughly before any repair work. Use a dry cloth to remove dust and debris. Wipe away any dirt that could interfere with adhesive bonding. A clean surface helps repairs stick properly and last longer.
Apply super glue carefully to the splintered section. Use just enough to coat the damaged fibers without creating excess glue. Let it dry completely according to the glue manufacturer’s instructions. Drying time matters because rushing this step weakens the repair.
Once dry, sand the area lightly with fine grit sandpaper. Sand gently to avoid creating new damage. You want a smooth surface that’s ready for your tip top installation. Remove all dust after sanding with a damp cloth, then let it dry again.
Finally, install your tip top over the repaired section. Choose a tip top with a longer tube length for extra reinforcement. Slide it on smoothly without forcing. The tip top protects the repair and provides structural support to prevent future splintering in that zone.
Preventing Future Splintering Through Proper Handling
Proper handling prevents most splintering problems before they start. The key is treating your blank with respect during every cast and every storage moment.
Avoid grabbing above the grip when you need leverage or support. This area lacks reinforcement, so squeezing it puts direct stress on the weakest part of your rod. Use the grip itself for handling instead. Hold the cork section firmly, never the blank above it.
Load your rod smoothly during casting. Quick jerks and sudden movements send shock waves through the blank that cause immediate damage. A smooth, controlled cast distributes force evenly. This means your hookset matters too. Set the hook with steady pressure rather than violent snaps.
Store your rod carefully in a rod case or on a proper rack. Avoid leaning it against hard surfaces where it might get knocked or bumped. Even minor impacts in this vulnerable zone can create hairline cracks that spread over time.
Keep your rod away from temperature extremes. Rapid temperature changes can cause the blank material to expand and contract unevenly, which weakens fibers in the unsupported area above your grip.
Watch for fly line tangles. When your line wraps around the blank during casting or stripping, it creates sudden tension that can splinter the blank. Take time to clear any tangles before they happen.
Inspect your rod regularly for small cracks or rough spots. Catching problems early lets you address them before they become serious splintering issues.
When you do install a new grip, slide it on gently without forcing. A proper fit requires only light pressure with two fingers. If resistance builds up, stop and check your blank for debris or damage.
These simple habits protect your blank from the stress that causes splintering above the grip.
Troubleshooting Recurring Failures On The Same Blank
When your fly rod blank keeps splintering at the same spot, you have a structural problem that needs attention. Some blanks fail repeatedly because they have a weak point in their construction or material quality.
Check if your blank has a manufacturing defect. Examine the exact location where splintering occurs on multiple builds. If the damage happens at the 6th guide area or another consistent spot, the blank itself may be compromised. This suggests the fibers were damaged during manufacturing or the taper has a weak zone.
Test the blank without any guides or grip attached. Flex it gently by hand. Listen for cracking sounds. Feel for soft spots or irregularities in the wall thickness. These signs reveal whether the problem is localized to one area or spread throughout the blank.
Document the failure pattern carefully. Write down the exact distance from the grip where splintering starts. Note whether it happens during casting, storage, or installation. Record the weather conditions when failure occurs. This information helps you determine if temperature changes trigger the problem or if only handling causes damage.
Consider the blank’s age and storage history. Old blanks can become brittle. Blanks stored in extreme heat or cold may have weakened fibers. Humidity changes can also affect how the fibers bond together.
If the same blank fails multiple times at the same spot, the blank may not be worth rebuilding. The structural integrity is compromised. However, if you want to attempt one more repair, reinforce that specific zone with a longer tip top tube that extends further down the blank. This distributes stress over a larger area and may prevent future splintering.
When you do rebuild, inspect the blank section carefully before installing any components. Remove any loose fibers with fine sandpaper. This prevents splinters from spreading during use.
Final Thoughts
Splintering above the grip usually points to a weak spot in the blank. This area often lacks the support that the grip gives to the lower section.
Sudden shocks cause most damage. A hard hookset, a fly line catch, or a rough cast can crack the delicate fibers above the grip.
Grabbing the blank for leverage also weakens this zone over time. Small stresses add up until the blank finally splits.
Grip installation matters too. Forcing a grip on can twist or crack fibers, and that damage may show up as splintering later.
The good news is that most cases stay manageable. A little super glue, some light sanding, and a properly fitted tip top can stabilize small splinters.
Smooth casting protects your rod. Avoid jerky movements that put sudden pressure on the tip section.
Keep your hands below the grip when you need extra support. This simple habit removes a lot of stress from the blank.
Store your rod with care. A rod case or rack keeps it safe from bumps that cause hidden cracks.
If the same blank splinters again and again, treat that as a warning sign. It may have a defect that no repair can fully fix.
In that case, weigh the cost of repeated repairs against the value of a fresh blank. Sometimes a new blank saves you time and frustration.
Regular inspection helps you catch problems early. Check the area above the grip often, especially after hard use.
Fly rods take a lot of stress with every cast. Understanding why splintering happens gives you the power to prevent it.
With smooth handling, careful storage, and quick repairs, you can keep your rod strong. Most splintering problems are avoidable once you know the causes.
Treat your blank gently, watch for warning signs, and your fly rod will serve you well for many seasons ahead.
Frequently Asked Questions
Why does splintering happen above the grip?
The area above your grip lacks reinforcement. Your cork or foam grip provides structural support below it, but the blank sits exposed and vulnerable in the zone just above. This zone experiences constant flexing during casting. When sudden stress hits, the unsupported blank fibers separate and splinter.
Can I fix minor splintering myself?
Yes, you can attempt a simple repair. Apply super glue directly to the splintered area. Let it dry completely. Sand the spot lightly until smooth. Then install a tip top with a long tube length. The long tube reinforces the damaged section and stabilizes the fibers.
What causes splintering to happen at the same spot repeatedly?
Some blanks have a weak point or manufacturing defect at a specific location. If your blank splinters at the same distance above the grip every time, the blank itself may have a structural problem. Document where the failure occurs. If it happens multiple times, that blank may not be worth rebuilding.
How do I prevent splintering in the future?
Load your rod smoothly during casting. Avoid sudden jerks or shock to the blank. Never grab above the grip for leverage or support. Keep your hands below the grip when you need extra stability. Install your grip gently without forcing it onto the blank. Handle your rod with care during transport and storage.
When should I replace the blank instead of repairing it?
If the same blank splinters repeatedly at the same location after repair, replacement makes sense. Weigh the cost and time of repeated fixes against buying a fresh blank. A structurally weak blank will continue to fail.

Hi, I’m Ivy Webb, the passionate angler and creator behind BaitHookVault.com. I spend my days out on the water personally testing and reviewing a wide variety of fishing tools and gear.