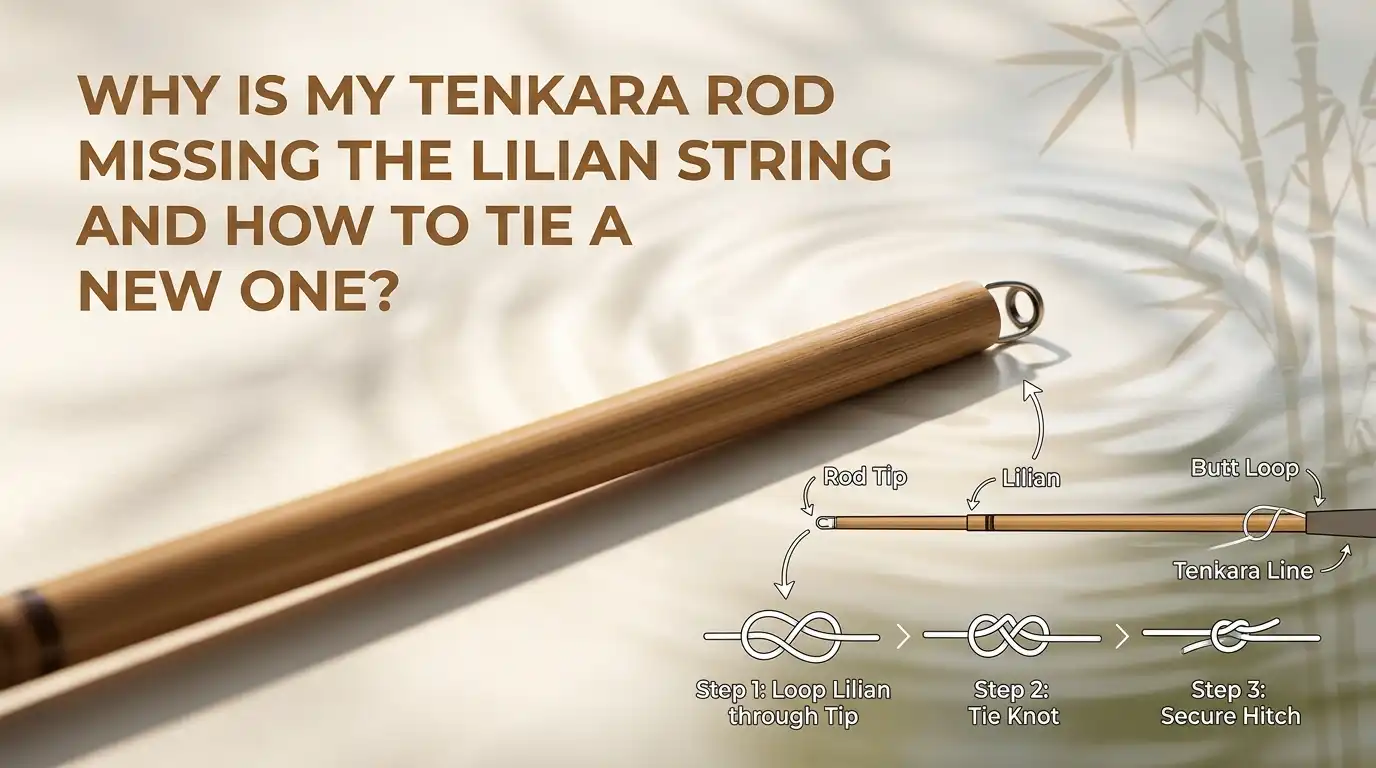
Why Is My Tenkara Rod Missing the Lilian String and How to Tie a New One?
You grab your tenkara rod, extend the sections, and reach for the tip. Then you spot it. The tiny braided string at the end is gone. That little piece of fabric, called the lilian, connects your fishing line to the rod. Without it, you cannot cast a single fly.
Do not worry. A missing lilian is one of the most common tenkara problems. The fix is simple, cheap, and you can do it at home in under ten minutes.
This guide walks you through every step, from finding out why it happened to tying a fresh lilian that holds strong on the water.
Key Takeaways
- The lilian is a small braided cord glued to the very tip of your tenkara rod. It acts as a soft bridge between the stiff carbon tip and your fishing line.
- Lilians usually fall off because of old glue, water damage, or hard yanks on the line. Sometimes the manufacturer attaches it loosely, and it simply slides off during use.
- You can fix a missing lilian with three main tools: replacement lilian cord, a small bottle of super glue or UV resin, and a pair of sharp scissors. No special skills needed.
- The most trusted attachment methods are super glue, two part epoxy, and UV cure resin. Each has trade offs in drying time, strength, and clean up.
- A simple overhand knot or a girth hitch is all you need to connect your level line to the new lilian. Skip fancy knots until you get comfortable.
- Test the repair gently before fishing. Pull the lilian with light pressure first, then medium, to make sure the bond holds before you cast.
What Is a Lilian String on a Tenkara Rod?
The lilian is the small braided cord you see at the tip of your tenkara rod. It is usually red, orange, or sometimes white. It looks like a tiny shoelace, only thinner.
This little piece does a big job. It bridges the stiff carbon fiber tip of your rod and the soft fishing line you tie to it. Without the lilian, your line would slip right off the slick carbon tip.
The lilian also protects the rod tip from cracks. Carbon fiber is brittle at the very end. The lilian wraps around it like a soft cap. Most tenkara rods come with a lilian already glued on by the maker. If yours is missing, the rod left the factory that way, or it came off during use.
Common Reasons Your Lilian String Is Missing
Several things cause a lilian to vanish. Knowing the cause helps you avoid the same mistake later.
Old or weak glue is the top reason. Factory glue can dry out, crack, or lose its grip after a few seasons. Heat in a hot car speeds this up. Water damage is another big cause. Wet glue softens, and a quick tug pulls the lilian right off the tip.
Hard yanks on a snagged fly also rip the lilian away. When your hook catches on a branch, pulling straight back puts all the force on that small bond. Improper storage matters too.
Closing the rod with the line still tied tight can twist the lilian until it tears free. Sometimes, a brand new rod arrives without a lilian because of a factory mistake. In that case, contact the seller first before doing any repair.
Tools and Materials You Need for the Repair
Gather your supplies before you start. Having everything in one spot saves time and stress.
You need replacement lilian cord. Most fly shops sell it in 3 foot pieces. One piece can fix five or six rods. You also need a sharp pair of small scissors. Dull blades fray the cord and make a mess.
For glue, pick one of three options: super glue, two part epoxy, or UV cure resin. Each works well. You also need a small piece of fine sandpaper, around 400 grit. This smooths the rod tip before glue goes on.
Optional but helpful items include a small drop of baking soda to harden super glue fast, a UV light if you choose resin, and a pair of tweezers to hold the cord steady. Keep paper towels nearby for spills.
Step by Step Guide to Tying a New Lilian
Now for the main repair. Take your time on each step.
Step 1: Extend the top section of the rod. Look at the tip and remove any old glue with light sanding. Be gentle. You do not want to thin the carbon.
Step 2: Cut a fresh piece of lilian about 4 inches long. The extra length gives you room to trim later.
Step 3: Slide one end of the lilian over the rod tip. Push it on about half an inch. Twist as you slide so the braid opens up and grips the tip.
Step 4: Apply a thin coat of glue around the tip where the lilian sits. Press the lilian back over the wet glue. Hold steady for one minute.
Step 5: Let the bond cure fully. Super glue needs five minutes. Epoxy needs a few hours. UV resin sets in seconds under a light. Trim the loose end to about two inches.
Method 1: Using Super Glue for a Quick Fix
Super glue, also called CA glue, is the fastest way to attach a new lilian. Most anglers reach for it first because it works in minutes.
Apply one drop of super glue to the last quarter inch of the rod tip. Slide the lilian over the glued section. Hold for thirty seconds. If you want extra strength, sprinkle a tiny pinch of baking soda on the bond. It hardens the glue instantly into a tough shell.
Pros: Cheap, easy to find at any hardware store, dries in under a minute, and creates a very strong bond. Works for field repairs when you are far from home.
Cons: Brittle once cured, so it can crack if the rod flexes hard. Glue can run down the rod and make the tip stick inside the next section. Skin glue ups are common, so work slowly.
Method 2: Using Two Part Epoxy for a Stronger Bond
Two part epoxy gives the strongest bond of all three options. Anglers who fish big water or rough creeks often pick this method.
Mix equal parts of resin and hardener on a scrap of cardboard. Use a toothpick to spread a thin film on the rod tip. Slide the lilian over the tip and wipe away any extra glue with a paper towel. Let it cure for at least four hours.
Pros: Extremely strong, flexes with the rod, and resists water and heat. A good epoxy bond can last years. It also fills small gaps if your lilian is slightly loose on the tip.
Cons: Long cure time. You cannot fish right away. Mixing can get messy if you use too much. Some epoxies turn yellow over time, which looks ugly on a fine rod. Buy a small tube for occasional repairs.
Method 3: Using UV Cure Resin for Clean Results
UV cure resin is the favorite of fly tiers. It stays liquid until you shine a UV light on it. Then it hardens in seconds. This control makes it the cleanest option.
Place a drop of UV resin on the rod tip. Slide the lilian into place. Adjust the position with tweezers if needed. Shine the UV light on the bond for about ten seconds. The resin locks in place with no mess.
Pros: Total control over cure time. No wasted product. Creates a smooth, clear finish that looks factory made. Perfect for indoor work and detailed repairs.
Cons: You need a UV light, which adds cost. Resin bottles dry up if left in sunlight. Some resins stay slightly tacky after cure and need a wipe with alcohol. Not ideal for streamside fixes.
How to Tie Your Fishing Line to the New Lilian
Once the new lilian is set, you need to attach your fishing line. Two knots cover most tenkara setups.
The first is the simple overhand knot. Tie a small overhand knot at the end of the lilian. Slip your level line loop over the knot, and pull tight. The knot stops the line from sliding off. This works well for beginners.
The second is the girth hitch. Make a small loop in your level line. Pass the lilian through the loop. Then pass the loop over the end of the lilian and pull snug. The girth hitch grips tight and releases fast. It is the most loved method among tenkara anglers because you can change lines in seconds without retying anything on the rod.
Tips to Make Your Lilian Last Longer
A few simple habits keep your new lilian in place for many seasons.
Always dry your rod before storing it. Pull the line off the tip, wipe the lilian with a soft cloth, and let the rod air dry overnight. Wet lilians weaken the glue underneath.
Untie your line at the end of every trip. Leaving a knot on the lilian for weeks slowly stretches and frays the braid. Store the rod in a cool, dry place. Hot cars and damp basements ruin both the glue and the cord.
When you cast, avoid sharp, jerky motions on a snag. Walk to the snag and free the fly with your hand. Pulling hard puts all the force on that tiny bond. Inspect the lilian before each trip. Catch problems early before they cost you a fishing day.
How to Avoid Damaging Your Lilian During Use
Damage often comes from small habits you do not notice. Fixing them keeps your repair strong.
Never close the rod with the line still tight. Loosen the knot first. Closed rod sections pinch the lilian if line stays taut. Keep the rod tip inside the handle when you pull line off the spool. This was the advice given by the founder of Tenkara USA, who broke his own tip by forgetting it.
Watch where you set your rod down. Sand, gravel, and rocks scrape the lilian. A simple rod sleeve protects the tip during travel. Check the knot on your line every hour of fishing. Wet knots slip. A slipped knot means a lost fly and stress on the lilian when the line whips back.
Field Repair Tips When You Are on the Water
A lilian can fail miles from your car. Carry a small repair kit in your vest.
Pack a 6 inch piece of spare lilian, a tiny tube of super glue, and a small razor blade. The whole kit fits in a pill bottle. If your lilian falls off streamside, dry the rod tip on your shirt, slide the new lilian on, add one drop of glue, and wait two minutes.
Some tenkara rods hide spare lilian inside the cap on the rod handle. Check your rod cap before buying extras. If you do not have replacement cord, you can use the loop of a furled line or a piece of strong sewing thread as a temporary fix. It will not last long, but it gets you through the day.
When to Replace the Entire Tip Section
Sometimes the lilian is fine but the rod tip itself is broken. In that case, a new lilian will not solve the problem.
Look closely at the very end of the tip. If the carbon is cracked, splintered, or shorter than usual, the tip section needs replacement. Contact the rod maker. Most tenkara brands sell replacement tip sections for a small fee.
A broken tip with the lilian still attached often happens when the rod gets closed wrong. In that case, ordering a factory tip is faster and safer than trying to glue a lilian onto a damaged stub. Trying to repair a cracked tip with glue alone usually fails. The crack spreads, and you lose more inches each trip. Replace it once and fish in peace.
FAQs
How long does a properly glued lilian last?
A well glued lilian can last three to five years with normal use. Anglers who fish every weekend may need to replace it sooner. Yearly checks help you spot wear before it becomes a problem.
Can I fish right after gluing a new lilian?
It depends on the glue. Super glue with baking soda is ready in two minutes. UV resin is ready instantly. Epoxy needs at least four hours before any pressure. Wait the full cure time to avoid a second repair.
What color lilian should I use?
Color is personal. Most anglers pick bright red or orange because they show up well against water and sky. Red also makes the line connection easy to see when tying knots. Choose any color you like.
Is replacement lilian the same for all tenkara rods?
Most lilian cord works on most rods. Check the tip diameter of your rod first. Some Daiwa rods use a thicker lilian that may not fit slim tips. Buy a brand that lists rod compatibility, or ask the seller.
Can I use regular sewing thread as a lilian?
You can in an emergency, but not for the long term. Sewing thread is too thin and weak to handle fish weight. Real lilian cord is braided polyester made to flex with the rod. Use proper cord whenever you can.
What if the new lilian keeps falling off?
If your repair fails twice, the rod tip may be too smooth or too damaged for glue to grip. Sand the tip lightly with 400 grit paper to give the glue something to hold. If it still slips, switch to two part epoxy for a stronger bond.

Hi, I’m Ivy Webb, the passionate angler and creator behind BaitHookVault.com. I spend my days out on the water personally testing and reviewing a wide variety of fishing tools and gear.